Drew's Guitar Shop
West Seattle Guitar Repair
All Fretted Instruments Welcome
Open from 10am-7pm Monday-Friday
All About Frets
Fretwire
Nickel Silver
Nickel silver, also known as German silver, is an alloy made from copper, nickel and zinc. Nickel silver is the traditional stuff and common on most guitars. The name is a bit misleading as the alloy contains no actual silver, but does have a color and sheen that resembles silver. One of the reasons this is so commonly used as fretwire is that this material is hard enough to form a good solid contact surface for guitar strings, but soft and malleable enough that it is forgiving and easy to work with and conforms nicely to the fretboard of the instrument receiving the fret job. These frets will last many years and will maintain the original tone of an instrument where harder fretwires like gold evo and stainless steel can be a little more bright sounding than traditional nickel silver.

Gold Evo
Gold Evo is a nickel free alloy made from copper, tin, iron and titanium (CuSn15Fe1Ti0). It has been used to make durable frames for glasses for years, but is now available as fretwire. Gold evo is harder than the standard nickel silver frets used in most guitars, but is softer than stainless steel fretwire which is also an available option. The color of this fretwire is not a plating and will remain despite wear or future fretwork.
If you are looking for something harder than standard fretwire with a lustrous color that is a little different, gold evo might be for you.
*This fretwire may sound a little brighter than nickel silver.

Stainless Steel
Stainless steel fretwire is pretty self explanatory in its composition. Its nickel free, shiny, a little brighter looking than standard nickel silver frets, but more importantly, it is VERY HARD. Stainless steel frets are much harder to work with, much harder on tools and on the hands of the craftsman doing the work, but the resulting fretjobs will last many decades.
*This fretwire may sound a little brighter than nickel silver.

Doing a Complete Refret
The process starts with an assessment of your frets, the guitar’s neck and other factors that will determine what the best course of action will be. In some cases, a level crown and polish might be an opinion for you, in some cases, more targeted solutions can be used and in some cases, the frets themselves aren’t the problem at all. The things I will normally consider as factors for a refret candidate are:
-
Are the frets too low, or pitted so badly that leveling past the pits would make them too low?
-
Is the instrument in good shape otherwise?
-
Is it more effort and cost to do a refret than to simply replace the neck or guitar?
-
Is there major inlay work present or inlay work being planned?
-
Are there cosmetic or playability benefits you are wanting from having a different kind of fret wire installed or a different radius?
See pics for examples:

These frets are badly worn and deeply pitted. This is a classic example of severe fret wear necessitating a re-fret

This is the same guitar as the pic to the left without the strings. You can clearly see how bad this wear is.

It looks like someone took a Dremel drum sander to these frets and hit the fretboard a bit while they were at it. These are unsalvageable.

Though most of these pits could be leveled out, that deepest pit in the upper left would require the frets to be leveled far too low to be playable, let alone crowned.

That gorilla glue in the middle of this shot is indicative of some pretty terrifying amateur work. The fret to the left of it is flattened to almost nothing. This will need help.

This is the same guitar as the picture to the left. You can see these flattened frets are smeared on the sides with gorilla glue and there are gaps under the frets. These are not only unsalvageable but will need special care to remove them. Also note that piece of paper crammed under the B string at the nut when perhaps a nut shim or replacement should have been done.
If its determined that a refret is the right solution, the next step is to use a combination of special tools to remove your old frets. This must be done carefully to avoid pulling up splinters from the fretboard and causing other damage.


Once the old frets are removed, the nut must be removed so that it’s possible to use a long leveling block lined with sandpaper to re-tru the fretboard. This is a precision operation that must be done with a very specific shape within a tolerance of thousands of an inch.


In the case of a cheap plastic nut like this one, I am going to recommend that we replace it with a custom bone nut since we are going to need to shim this one anyway once the refret is done.
Note how long this block is. Ideally, for leveling, you want as much contact as possible with the board in other to get it consistently flat. The bottom of this block is concave to sand a 16" radius into the board to match the original radius and maintain the comfort and feel of this guitar. If desired, a different radius could be sanded into the guitar's fretboard at this point in the refret. Some electric players will opt for a compound radius that starts steeper at the nut and flattens out toward the body. Whatever the radius, the fretboard must be precisely shaped in three dimensions in order to play correctly consistently.
Once the fretboard is retrued, the fret slots must be prepped. This is perhaps one of the most time consuming parts of the fret job. Each slot much be deep enough to accommodate the tangs of the new fretwire and completely cleared of all debris. Even a little fleck of sawdust or a slightly shallow fret slot could prevent the new frets from seating correctly. This must be done without splintering or otherwise damaging the fretboard, delaminating finish at the ends of the fretboard or damaging binding.

This is a specially gauged saw with an adjustable depth guard used for cutting fretslots on un-bound fretboards. One of the best tools for the job.

This is an exacto knife with a blade that I have modified into a chisel specifically for cleaning fret slots in fretboards with binding and other special situations where one of my saws or a fine time Dremel burr wouldn't be the best choice.

This is a saw specifically for fretboards with binding. The shorts sections of saw blade allow this to better work between the bound sides of the fret slot and clear it of glue and debris
Once the slots are clean, the edges of the slot must be delicately and carefully chamfered in order to allow the new frets to seat properly and prevent tear out when the guitar sees its next refret.

Next comes preparing the frets!
The fretwire must be radiused using a special device that bends it in the correct direction without twisting it or otherwise damaging it. This is done to a slightly steeper curvature than that of the fretboard to compensate for the fact that the fretwire will want to flatten out and deform in such a way that will prevent it from properly seating if it is left flat or not slightly overly radiused before installation.


Sections of fret wire must be measured out and cut with an abrasive cutting disc. Cutting these lengths with clippers would damage the fretwire, potentially twisting the tang and pinching off the bottom of the crown and preventing the frets from seating
correctly. Cutting must be done without much to spare in order to prevent overhang that can also pose problems for correctly seating the frets.


Once the lengths have been cut, the ends must be prepped. Regardless of whether or not a fretboard has binding, I always trim the tangs of the fretwire I install. One reason I do this is for aesthetics. I simply like the way it looks better when all that is visible of a fret is the crown. I feel that this makes a sharper looking line down the neck than leaving the tangs visible as the tangs have teeth that can sometimes make one look a little wider than the one next to it and having a bunch of them visible from the side of the neck sort of breaks up what I feel like should be a solid line of the corner of the fret bord. I also think trimming the fret tangs makes side dots more visible.
One of the the other reasons I do this is that as a guitar ages, the fretboard will tend to shrink causing the fretwire to stick out the sides of the board. If the tangs are left at the ends, that is one more thing that complicates trimming these back down in a way that looks pretty.
I have tried different ways of doing this in the years that I have been doing this and I have found that the trimmed fret tangs really are the better way to go.


I am using a permanent pen here to mark off how far back I want to trim the fret tang from the edge of the fretboard.
One side needs to have the mark transferred to the other side since my tang nipper only works in one direction.

This is the tool I use to trim the tangs without damaging the rest of the fret wire. It's expensive and highly specific in the way that it cuts but it does a good job of it.

This is a fret with the tang trimmed at both ends. Though this could be installed just the way it is, for the sake of detail, I like to do a little more work on it after this point so that it seats better and looks better.

A little bit of tang is always left on the trimmed portion of the fret that must be removed carefully with a file without changing the shape of the crown. For this I use a needle file that has safe sides with no teeth to work just that one part of the fret. I will also round over the trimmed tang because I find that if left sharp, the tang can catch on the inside of the fret slot and cause problems.

Here is a fully sculpted fret from the side. Note the end of the tang is rounded over .

Looked at from the top, you can see that the underside of the crown is smooth and consistent so it will sit nicely against the fretboard.
Once the frets have all been radiused, cut and trimmed, they must be cleaned with a degreaser. Most metal products come covered in various oils that are used in processing and shipping and in order to form a reliable glue joint which needs to happen in the next step, this layer of oil bust be removed. I like doing two passes, one with naphtha and a second with isopropyl alcohol while also handling the frets with nitril gloves to prevent my skin from adding any new oils to the equation.
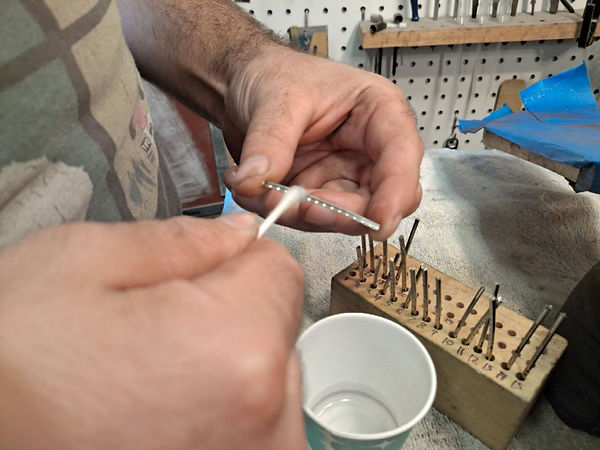
I'll usually use cotton swabs and use one pass of NAPTHA, then a dry wipe followed by isopropyl alcohol followed by a dry pass. Between the two solvents, any oil or water based contaminates will be cleaned off the fret wire enabling glue to adhere to it. This is important since most metal products, including many that are non-ferris come coated with some kind of light protective oil from manufacturers and speaking from experience, its a good idea to clean any metal surface you plan on glueing to anything. This might be me going a little overboard, but it doesn't take that much time and in my opinion is worth taking the time to do.
Next comes actually installing the new frets. I use a combination of hammering and gluing here in order to install frets. I dab a little CA glue on the fret tang before tapping it home in its new slot. This ensures that when the fret is seated that it stays seated, even as the other frets are installed.

I am using a toothpick here to apply medium viscosity super glue or CA to the fret tang. I have a limited amount of time to install the fret once this glue goes on because if it hardens before its in the slot, it will prevent the fret from seating correctly.


Tapping in with a setting mallet is my preferred method of installing frets. There are all kinds of fancy jigs and tools out there for doing this job, but in my opinion, this is always going to be the way I like doing it best. This mallet was the first luthier tool I ever made. That handle is from one of the kitchen chairs from my childhood home, the mallet head was carved from a poplar scrap from one of my first guitar projects. It's a tool that has treated me very well over the decades.
The black canvas sack underneath the neck here is filled with bird shot in order to absorb the shock of the hammer blows from tapping in the frets. It's pretty essential that there is something to do that since shock traveling down the neck can shake braces loose, or cause frets to unseat. In general, care should be taken when doing anything that mixes impact with musical instruments.
Similar to the bag of birdshot in the photo to the upper right, my hand is doing the work here of absorbing the shock from the fretting mallet. I am applying upward pressure to the underside of the soundboard beneath the tongue of the fretboard. There are devices made for this that can be bought, but what can I say, I am old fashioned.
With the frets installed, the ends of the fretwire are now trimmed flush with the fretboard using specialized cutters.


These clippers have been modified to cut flush with a surface and cut the frets right up to the edge of the fretboard. This is another one of those tools that has been with me for a long long time. I inherited these clippers from my grandmother who may well have gotten them from my great grandfather. They see a new life with me in my craft.
After trimming the fret ends comes the level crown polish phase of the operation.
Glue, Level Crown and Polish or “LCP”
I decided to write this as its own section here since this is a procedure that is sometimes done to already existing frets in order to correct pitting, unlevel frets, flat crowns and other issues. In a lot of cases, when I get folks in who think they need a total refret, all they really need is a good level crown and polish in order to get the guitar playing again.
In fact, frets normally see one or two level crown and polish jobs before a total refret is needed.
First I will start by oiling the board. This helps prevent excess glue from sticking to the board and making a huge mess. Remember that the board was sanded flat and polished out during the truing process so the less work done on the wood itself at this point, the better.


Next I will use a thin viscosity superglue in a pipette and wick glue in along fist one, then the other side of the newly installed fretwire, immediately cleaning any excess glue with a q-tip. This helps fill in any gaps and ensures complete and total contact between the fret tang and the fretboard the entire length of the fretwire. It also will greatly help keep the frets stable though future expansion and contraction cycles that that fretboard will go through over time and help prevent the fretwire letting go and unseating frets as the guitar ages. On guitars that are already fretted, like in the case of only doing a level crown and polish, this will help to stabilize frets that may have shifted, lifted or otherwise moved or let go of the fretboard. In order to actually level and crown them, they *must* be stable first, which is why this step is so important. It is so important that I often think of this job as a "glue level crown and polish," since in most cases, this needs to be done.


Once the glue has had time to do its thing and work its way into all the nooks and crannies, I will hit the board with a little super glue accelerator to ensure that all of the glue has cured properly before continuing.

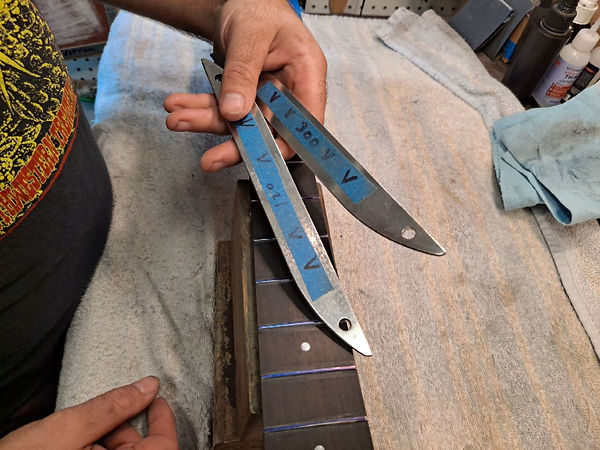
With the frets glued in, the time has come to start shaping them. The first step is dressing the fret ends. I have several ways I will approach this part of the job depending on what’s being done. Different companies have different looking fret ends and in some cases the same company will have different looking fret ends depending on the era. Fender frets tend to be rounded over at the ends, older gibsons tend to be very boxy and pronounced, newer martins have a graceful 30 degree bevel and older martins and some other companies had what is known as “domed” fret ends. Most modern guitars have a clean 30 degree bevel. In some cases this matters more than others, like in instances of trying to keep the original look and feel of a vintage guitar, however, many players will often opt for doing the standard modern 30 degree bevel as it is consistent with many other modern guitars, looks good and feels good.

This block holds a file at a perfect 30 degree angle so that I can take the fret ends down consistently. I will carefully work them all down flush with the board and then use it to bevel a very small chamfer in the fretboard.
With the frets beveled, next comes leveling. Leveling at my shop is done with a 8” block that I have specially made for doing this job. It is perfectly flat, checked often and can span many frets on the board, sanding them all at once in order to ensure they are perfectly flat relative to each other. This is another operation that requires a lot of precision. Every single fret must be perfectly flat. Leaving one high, the frets behind it will buzz. Leaving one low, that note will buzz on the frets in front of it. They must all be leveled while also removing the least amount of material possible. Each fret checked at all points along its length using a special short straitedge called a “fretrocker.” The fret rocker works because it spans three frets at a time. If any fret is unlevel, the fretrocker will rock back and forth like a seesaw to indicate the spot needs more attention. All frets must be leveled until there is no rocking.

I use a blue sharpie to color the tops of the frets to clearly see which ones are being touched and which ones aren't. I don’t know why, but blue is the color that does the best job.

This is my 8" leveling block. You can see that it spans many frets at a time making it a good tool for getting everything level. Too short a block and it would run more of a risk of toughing some spots more than others.

This is the Stewmac fret rocker I use here at the shop. There are other companies that make these too, but I can say for sure that the Stewmac one is pretty reliable. This is basically a 4 sided mini machined straight edge. It will rock if any three points it touches aren't level.

If you just level the frets but don't crown them, you will end up with something that looks like this. Flat on top. While they might be level, the flat surface on the top will create issues like buzzing, dead notes, bad intonation and more. You really do want the contact point for the string to be as narrow as possible and dead center in the middle of the fret.
The importance of crowning
When the frets are leveled out, you might notice that they are not quite flat on top. While they will all be level with each other, this flatness will, in my opinion, prevent them from being optimal for playing. A flattened crown will move the contact point for the string from the center of the fret where it belongs based on the math that layed out those fret intervals throwing off intonation. The string contacting a wide surface rather than a clean, clear point will rob a guitars tone of crispness. You could, in extreme cases, even have dead sounding notes or even slight buzzes caused by flat fret crowns.
With this in mind, this is why the next step is crowning the frets. What that means is filing the corners off that flat crown. Slowly and carefully working the sides of the frets until the tops are rounded and come to a distinct, thin crown right in the center of the fret. This thin contact point must still be level with the frets around it and so you never file the top of the fret directly, but work your way in from the sides creating a nice new crown. A perfect new contact point for the string that will be right on target for maintaining intonation and tone.
For more information on level crown and polish jobs and why crowning is so important, follow this link at time stamp 6:11
The crowning files I use are a pair of the Stewmac offset diamond files that I will say are a fantastic tool and worth the money if you are doing a lot of fretwork. These are a very elegant and effective design that really does a great job in ever situation I have encountered doing fretwork. I don't normally like to advertise for products, but I will go to bat for these files. It sure beats the straight old fashioned steel ones and certainly beats crowning with a 3 sided file.

I Start off with my 120 grit file to take care of the bulk of the work quickly. I want to leave enough work for my 300 grit file that it will remove most of the 120 scratches.

The 300 grit file is my next go step. I'm thankful that with as long as I have been doing this, often, this will be the only one I really use for a job as I don't have a whole lot of crowning work to do after leveling. The more even you get the frets in at the start, the less leveling you need and therefore, less crowning.

Deburring the fret ends comes next. The bevel at the fret ends needs a little bevel of its own. This is to prevent that corner from being too sharp and hurting the players hands. Regardless of what work was done early in shaping the fret ends, deburring and shaping these will be necessary after the crowning process. The tools I will typically used for this job are a couple of modified bastard files and a triangle needle file that I have knocked the corners off of.

The tool I use for this is a small three sided file which I have rolled the corners off of. It perfectly kisses the corner of that bevel in the fret without biting into the fretboard. I can't even remember where I got this file or when, but I have been using the same one for years. Its good to have tools you have gotten to know this well.
After gluing, leveling, crowning and deburring, there will be a few marks and glue stains on the fretboard regardless of how careful you have been through the process, but its very easy (assuming you have worked carefully) to use a clean new razor blade to scrape the board clean. The scraper should leave a finer finish on the board than the 320 grit that was used on it last. Note: the very thin blue line on the tops of the frets. That is the new contact point for the string. Level with all the frets around it, and now crowned to a fine point in the middle of the fret.

With all the file work out of the way next comes polishing.
Polishing usually starts at 320 grit and works down to 1000 grit and then steel wool. This is to remove all the file marks and help polish up the fret board itself before finishing both out on the buffing wheel making them perfectly shiny and polished. This is not only for looks, though shiny frets are nice to look at. It is also to prevent any tool marks or sanding scratches from causing that sort of sandpapery scraping noise or tinging as strings are rubbed across the tops of the frets during playing.


The last step is oiling the fretboard. I use a formula I developed here over the years of 1 part kerosine as a cleaner and 2 parts lemon oil as a conditioner. This helps remove buffing compound from the fretboard, shine it up and protect it.
Below are examples of my completed fret jobs

Jumbo stainless steel in vintage Gibson SG

Jumbo stainless steel in vintage Gibson SG

Medium nickel silver in vintage Martin mahogany top

Medium stainless steel in vintage Silvertone jumbo

Jumbo Gold Evo in a LTD Deluxe
Partial refret
In instances where there is fret wear too severe for a level crown and polish to be a viable option, but the damage is completely or mostly limited to the first position (or within the first 7 frets) and you have healthy fret height everywhere else, a partial refret might be a good option. In a partial refret, the damaged frets are pulled out up to the 7th fret or so and the board is cleaned, prepped and new frets are installed and then a level crown and polish is performed on all the frets.
If the fretwear is severe and has occurred relatively quickly, it might even be worth it to replace those damaged first position frets with stainless steel. Stainless steel partial refrets are actually a really great option for a lot of acoustic guitar players that hang out in first position a lot and wear those frets unevenly relative to the rest of the frets on the guitar.
This procedure is cheaper than a full refret and while in some cases its the perfect solution, in others it will not fully address the issues a guitar might have, so its important to make sure this is the right solution before opting for it.

But what if you don't want any frets? Ok, well, then you may have to remove the ones currently installed in your instrument and convert it to a fretless version of itself. This is surprisingly similar to doing a simple refret in that we still need to remove the old frets, still need to clean the slots, install something in them, retru the fretboard and even polish, but there are some key differences. For example, extra special care must be taken to not have any tear out when removing the frets, and any that happens must be fixed as invisibly as possible. Even very minor tear outs will be visible since there will not be a fret crown covering the edges of the fret slots.
Once the old frets are out and the board is cleaned up, the slots will need to be cleaned just like in a refret, however, in this case we will not be installing frets, but filler material. This filler material is often just thin strips of binding, or it can be wood, or perhaps other material that will fill in the old fret slot. The two ways you can go with this are to use a material that closely matches the color of the fretboard to hide the conversion and make it look a little more like and instrument that was made without frets to begin with, or, you could choose a high contrast material that will let you know better where to put your fingers when playing. This is a personal decision and it's up to you what you want to do.
After whatever fill material you want is installed, the board will need to be retrued, and very precisely. There are no frets here obviously and so the whole board must be impeccable and free of any pits or issues that may result in a dead note, rattling or other playability issues. I also find that fretless instruments work better when they have a compound radius. That means we will start with a tight radius say a 9.5" to pick one for the sake of thinking about it, and then we flatten that out out something more like a 16" toward the body end which makes your fretboard radius a portion of a cone instead of a portion of a cylinder. This will help get cleaner tone with less risk of rattling and feel better in your hand.
After everything has been trued, the whole board is then polished out and oiled up for a beautiful sheen and protection.
One thing to note: It is best to stick to flat wound strings once you have done a fretless conversation. Round wound strings will bite into the bare wood more and decrease the longevity of the fingerboard. Plus, it just sounds a lot less...fretless, when you get that round wound fret noise sliding up and down the neck. But hey, it's your instrument. I can only recommend things, not tell you what to do.

Going Fretless
Compound Radius
If you have ever had issues with fretting out when bending notes, or something about the steepness of your guitars radius just seems off or hard to play the further up the neck you go, you might think about having a compound radius done on your guitar while it is in for fretwork. What is a compound radius? Well, most guitars will have a radius that will start at one measurement at the nut and end with that same measurement at the body. If you have 9.5" at the nut, you will also have 9.5" at the body joint. This is means that the typical guitar fretboard radius is a portion of a cylinder. However, this can create some problems, especially with the steeper radius guitars that have a 9.5" or 7.25" fretboard such as fretting out when bending notes and a less than ergonomic situation up the neck. This has been known about for many decades, and in fact one of the reasons that Fender moved to the 9.5" radius from their earlier 7.25" was for this very issue of fretting out during bends.
One way you can deal with these issues is to create a radius that is not a portion of a cylinder, but rather, a portion of a cone. A compound radius. This is a radius that will start steeper at the nut end and flatten out at the body end. You might see 7.25" at the nut and 20" at the body for a sort of extreme example. This gives you a flatter and more comfortable situation on those high notes as well as prevents the fretting out when bending.
The other nice thing about a compound radius is that there is a lot of leeway with the how steep or shallow you want things, or how dramatic you want the "cone" to be. You can make it something barely perceptible like 7.25"-12" or you can go with a much more dramatic change like the 7.25"-20" that I mentioned before.
When choosing what dimensions you want to go with, it might be best to try out guitars that have a different radius in the nut, middle and upper positions and see what feels most comfortable to you in each. Otherwise, you can give me a description of the feel you want and I can use my experience and best judgment.
I will say that in terms of comfort, compound radius instruments just *feel* better in my opinion. They are more comfortable, look better, they play better. It's honestly I think better to have one than not, its just a question of -need-. Some people will not need this to make their playing style work. Some may find it incredibly helpful. Use your best judgment as a player in deciding if this is something you want to go for.
Note: as mentioned above, the one situation I get into the shop where I STRONGLY encourage people to go for a compound radius is in doing fretless conversions. The compound radius will provide greatly improved playability on fretless instruments.