Drew's Guitar Shop
West Seattle Guitar Repair
All Fretted Instruments Welcome
Open from 10am-7pm Monday-Friday
Caring for Acoustic Guitars
Acoustic guitars are delicate and sensitive things. They are sensitive to moisture, heat, cold, impacts and other enviromental factors that you may not even realize are able to effect or damage your instrument. Understand that an acoustic guitar is essentially a finely crafted, but very thin wooden box with a neck attatched and under upwards of 140lbs of string pressure. These things are amazing feats of engineering, but you must also understand that they require care and maintenence if they are to be playable, sound great and look good.
On this page, I will talk about how to care for your acoustic guitar from top to bottom.
Contents:
Headstock
Tuners
Strings
Truss Rod
Nut
Frets
Fretboard
Neck Joint
Sound Box
Sound board
Sides
Back
Sound Hole
Bridge
Saddle
Important Tips

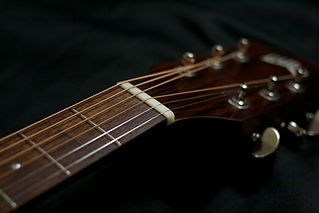
Headstock
Your guitar's headstock is the flat paddle-like thing on the end of the neck, opposite the body of the guitar. It typically will have the logo of the builder somewhere on it and will also serve as a mounting point for the guitar’s tuners.
Headstocks are thin, vulnerable and they are load bearing. Since this is where the tuners are located, the headstock is basically an anchor point of the strings. On an acoustic guitar, these strings are constantly pulling on the headstock with enormous pressure. A set of acoustic strings can easily pull about 140lbs! Now, because your headstock is tilted at about 14 degrees, it will be the first thing to hit the ground when your instrument stand is knocked over or you drop the guitar. That string tension combined with the weight and momentum of the instrument is enough to cause serious damage to the headstock and neck and often will result in a broken off headstock.
To help prevent your headstock from becoming damaged or broken, it is recommendable to not use a stand to store your guitar. If you must use a stand, try to purchase one that is heavy and stable and store it in a corner so that the walls on either side will break the instruments fall should it fall over. It is also recommendable to use a high quality strap and some sort of strap locking system to prevent your strap from coming loose and dropping your guitar. I also recommend NEVER leaving your guitar in a closed and unlatched case. Someone, probably the player, will pick that case up and all of its contents, including your guitar will spill onto the floor. This can result in an enormous amount of damage including a broken headstock so ALWAYS close at least one latch on the case.
Tuners


Sealed tuners


Open tuners

3 on plate tuners


Covered Tuners

The tuners or machine heads have a post with a hole in it allowing the string to be secured to it and a "button" or flat handle connected to a key that is part of a simple gear assembly that enables you to turn that post with the string in it, therby tightening or loosening the string. There are many different kinds of tuners with a variety of appearances but the working parts will most often be very similar, even if you can't see the moving parts.
Sealed Tuners:
Sealed tuners are about like they sound. They are tuners which have all of their moving parts sealed with a press fit metal housing. They contain their own lubricants, are extremely resistant to grit fouling and require very little maintenance.
Occasionally the the buttons on these tuners are held on with a screw. On such tuners, that screw can sometimes become loose and cause a buzz or rattle. This is always the first thing I check when I get a guitar in for a weird buzz or rattle. In the worst case scenario, you may end up losing a tuner button which can be expensive to replace. It is best to tighten these screws up a little if you notice them getting loose.
Warning: It is possible to strip these screws so only go finger tight!
Open Tuners:
Open tuners are tuners in which the gears are left exposed. Unlike sealed tuners, these need some regular maintenance to function at their best.
Since these moving parts are exposed to air and contact with materials, these will occasionally need a little lubrication. When I say "a little" I mean that a drop of oil is probably more than sufficient and by occasional I mean you should probably do it once every 5-10 string changes. Like on sealed tuners, the screw holding the button may also occasionally need tightening (finger tight!) and it is also good to keep an eye on the screw holding in the round gear. When oiling these things, I just let a little oil wick out of the spout onto moving parts and contact surfaces. If you have never done this before, try it! You may find your guitar much easier to tune!
Three on a Plate Tuners:
Other than the fact that there are three tuners mounted on a single plate, these are basically just open tuners and should be treated as such.
Covered Tuners:
These can often be mistaken for sealed tuners but they are not the same thing. These tuners are basically just open tuners with a cover over them to protect the gears. They are not sealed but can be much more resistant to dirt and corrosion than uncovered tuners.
Since these are not sealed in a press fit and airtight housing, they do need a little lubrication now and then. They may also experience issues with the screws holding the buttons or gears backing out. To lubricate, I will just put a little drop of oil on the tuner where the tuner key (the thing the button is attactched to) meets the tuner. This will wick its way into where it needs to go as you use it. It's best to do this just before you put a new set of strings on but should only be done every 10 string changes or so.
Older covered tuners will look a bit like the ones in this photo. That hole in the cover is actually for putting a little drop of oil in. This type of tuner is often found on older or reissue fenders, gibsons and other vintage guitars.
Vintage covered tuners
Strings
Strings are a huge part of your instrument's tone and there are tons of options and factors to consider when choosing the right ones for you. Learning about differences in manufacturing and materials will help you find the tone you want but it's also important that you know what different gauges will do and how to properly install a set of strings. I have two videos here on my website that demonstrate how to remove bridge pins so you can pull the old set of strings off the guitar and another on how to properly install new strings. I know it seems dead simple, but there are a few tricks I show in these videos that even advanced players may benefit from. I recommend that a heavily played guitar have its strings changed every 1-2 months.
String Gauges
I am starting with this for a very important reason. The gauge of string you use should be dependant on the guitars setup. One cannot simply change from lighter to heavier strings or vice-versa without drastically altering the action of an acoustic guitar and possibly throwing off the instruments setup to the point where it will not play the same even if you switch back. Each string pulls a specific amount of tension based on it's thickness, or in this the case of wound strings (G,D,A & E) the thickness of their core. This tension will cause the soundboard and neck to bow more or less depending on whether more or less tension is being applied. What this means is that if you replace your light strings with heavy ones it will make your instrument needlessly harder to play unless you are also having the guitar setup to play properly at that tension. Conversely, replacing your heavy strings with light ones may cause a lot of buzzing and other serious playability issues. I strongly recommend finding a brand and gauge you like and sticking with it until or unless you decide to have your guitar setup for something else.
Now with setups being mentioned, there are specific reasons one might want to go with thicker or lighter strings. Thicker strings are going to be louder, richer and more reactive to touch than thinner strings. This is because they produce more energy when plucked based on the fact that there is more matiel moving under higher tension as compared with lighter strings. On the other hand, maybe loud isn't what you are going for and maybe your instrument isn't one that should be taking higher tension strings. If you are wanting to have a lighter mellow tone, light strings will probably serve you a bit better. You will also find the guitar feels a bit easier to play. Particularly for electric players that only occasionally pick up their acoustic, lighter is usually better. Another great reason to go with lighter strings is if you have a very old instrument or one made more delicate by structural issues.
Materials
Acoustic strings are generally going to be steel and bronze. You can find acoustic strings made from different materials including brass but for the most part acoustic strings you are going to find will be steel and bronze. There are different types of bronze used for guitar strings. Normal bronze and phosphor bronze are the two most common and both have different properties making them more or less desirable. Bronze will be brighter and have a lot of clarity but it also is not corrosion resistant. Phosphor bronze will be warmer sounding with a bit of earthier tone and is naturally corrosion resistant making these strings last a bit longer.
Truss Rod

This is not, in my opinion a user serviceable part and thus I will not be talking about how you should be adjusting it. Generally speaking, the only person qualified to know if your truss rod needs to be adjusted is a trained luthier. There are also tools and prescribed measurements for needed for adjusting a truss rod that most people will not have just laying around the house and the prescribed measurements it should be dialed in to are so fine they are measured in thousandths of an inch. My advice on truss rods is: DO NOT TOUCH.
Truss Rods seem to be something that is shrouded in myth from what I hear most players say about them. They are perhaps the one part of the guitar about which I hear the most disinformation, confusion and sometimes dangerously bad advice. I have heard and seen people told that truss rods are used for everything from adjusting string height to changing the tone of an instrument. Now, this would be relatively harmless other than people unwittingly throwing off their setups and making their instruments play terribly were it not for the fact that truss rods can strip, break and rip apart an instruments. Adjusting a truss rod without the proper knowledge and tools can destroy your guitar!
Things truss rods are *NOT* for:
*Raising and lowering the the strings.
*Making the neck perfectly straight.
*Adjusting "action."
*Anything other than the uses given below.
Things truss rods are used for:
*Adjusting neck relief.
*Resisting sting pull.
Thats it! Seriously, that is all it is there to do. For the sake of yourself and the health of your instrument, I strongly recommend not messing with your rod. Touching your rod makes guitar jesus cry.
Nut
The guitar's nut is the contact point for the stings opposite the bridge and marks the end of your "scale length." It is usually made from plastic, graphite or bone and guides the strings into a uniform spacing, elevates them above the frets and transfers energy from the string vibration into the neck of the guitar.
Sometimes tuning issues can result from one of the nut slots "pinching" the string. If you have a string that is doing this, you will likely hear a popping noise or a "ting" when the string breaks free of this pinching. There are two solutions to this and one of them is easy to do yourself. You can take a mechanical pencil with the finest lead you can get and lubricate the bottom and sides of the nut slot by coloring it with the pencil, thereby coating it with a thin layer of graphite which acts as a great lubricant. Just be careful when applying this graphite coat because it can make a mess. I actually recommend doing this every time you change the strings even if you don't have this problem because it makes tuning a lot smoother.
Now, if the graphite does not do the trick, solution number two is to bring it into the shop to have the nut worked on, perhaps as part of a full setup, but there a number of things that will likely get fixed at the same time if you bring it into the shop
In a lot of cases, the nut slots on new guitars are not dialed in. Ideally, you want the nut to elevate the string only as high as one of the frets on the guitar would. However, when these nut slots are not dialed in it can make the instrument hard to play and even throw it out of tune. When I work on a nut, I make sure that the slots are exactly as wide as the need to be for the string and that they bring the string within a few hairs (literally) of the frets. This often times makes a HUGE difference in the way a guitar plays and feels and players are shocked at how easy their instrument plays.
Lastly, most guitars come stock with a plastic nut. Plastic is a terrible conductor for energy and will greatly reduce the amount of tone being transferred to the neck of the guitar by the strings. Since this is not over the soundboard, most people assume this isn't a huge loss, but this is not true. There are actually a lot of subtle overtones that actually get transferred by that nut. Try this sometime: hold your guitar upright on a safe surface by the headstock and strum the strings. While they are ringing, put your hand on the neck and see how it changes the tone. If you notice the difference, you may want to upgrade your guitar to a bone nut as part of a full setup. It will last longer, work better, sound awesome and can also add to the looks of a guitar.
Frets
Frets are those little metal bars that run perpendicular the neck or fretboard. They are typically made of nickel silver and serve as the contact point for the strings when you are playing different most notes. They are also kind of a big deal in terms of how your instruments plays and sounds.
Most fretwire contains copper and copper is prone to corrosion. What makes frets particularly susceptible to this is the oils in human skin. You will eventually begin to see your frets get more hazy, gray and less shiny over time and may even see some blue or green crust start to appear on them. This is not what you want. It looks gross, it feels gross, it stains your fingers and, it actually detracts from an instrument's tone. Think about it, if you are trying to push the string into a fret, but that fret is covered in corrosion, you are actually pushing the fret into that corrosion. This is easy to fix though. Take a bit of blue painters tape and stick strips of it to your shirt a few times to reduce its adhesion. This is important to protect your instruments finish. Next, use that tape to cover the sound hole of your guitar. You can skip this step by using a feedback buster if you have one. Next, carefully and with the grain of the fretboard, take some 0000 or 00000 steel wool and polish the frets. If the corrosion is really bad, you may have to work at this for a little while but try to avoid applying a more pressure than you need. Your frets will start to shine like new again and you should notice your guitar sounding a bit clearer. Also important, DO NOT WIPE AWAY THE STEEL WOOL WITH A RAG. Take the guitar outside and blow it off with your mouth or an air compressor. DO NOT USE CANNED AIR as canned air contains very cold propellants that can damage your finish. It's also a good idea to get the tape off your guitar as soon as possible. It's a good idea to do this every 1-2 string changes.
High or low frets can sometimes cause buzzing or fretting out. Fret buzz may take many different forms from a slight rattle, to a sitar-esque twang to sounding like a dead string. On older guitars, this may be due to fret wear and on newer guitars it may be caused by poorly installed/unlevel frets. Not all things that sound like fretbuzz are caused by high frets. Sometimes there is a more setup orenented solution. If a guitar does have a fret problem, there are solutions but you should consult with a luthier about which solution might be best for your guitar.
Fretboard
The fretboard of your guitar is what makes up the playable portion of the neck and is what all your frets are on. It is usually made of rosewood or ebony and contains inlays or dots made of plastic, pearl or abalone. In most cases, fretboards are bare wood.
It is important to condition your fretboard. Since it is bare wood, fretboards will tend to dry out over time and this can eventually lead to it cracking. To condition it, you can purchase several products made for this express purpose or you can just use lemon oil. Just take a little bit of lemon oil or the product of your choice and apply it to a cotton rag, then rub it into the fretboard. This works best if you have polished the frets before hand to remove all the gunk that tends to collect on fretboards. I recommend giving your fretboard a light conditioning every string change.
Neck Joint
Your guitar's neck joint is pretty much the most critical joint in the whole instrument and I want to touch on how these work so that you can be more conscious about handling your guitar safely.
Neck joints on guitars are traditionally done with what's called a "dovetail" joint where the neck has a V shaped shaft that fits into a matching slot in the neck block. The neck block being a block of wood that is inside the guitars body where the body meets the neck. However, there an awful lot of guitars being produced where there are different sorts of joints being used. Taylor guitars and Collings for example use a bolt on design in which bolts run from the inside of the body, through the neck joint and into the neck. This makes manufacturing easier and cheaper for builders and makes repair costs much cheaper for the player. I personally am a big fan of these bolt on neck designs. There is also a third method of doing neck joints that I commonly see used on cheaper student grade guitars that is done with dowels. Now, the reason this is worth mentioning is because these doweled neck joints are not nearly as strong as a dove tail or bolt on neck and are typically found on guitars that are likely to take far more abuse than those with dovetail or bolt on necks. These doweled neck joints rely on thin round pieces of wood to produce a mechanical joint between the neck and the guitar. Those pieces of wood are generally about 1/4" thick and there are usually only 3-4 of them involved in the joint. This means your neck is attached with what amounts to less than a 1" X 1/4" piece of wood. The other issue with dowels is that they are not a very reliable form of joinery in terms of consistency and its very easy to do poorly thus some of these joints involve very little wood and also have poor glue joints. Now, I am not writing this this to scare you, I just want you to understand that this is a fragile area on some guitars. You should bare in mind when handling your instrument both how these joints work and the fact that they are under an enormous amount of constant stress from string tension.
Be careful installing strap buttons or doing any work in this area and be gentle with your guitar and avoid applying leverage to this joint.
Body or "Sound Box"
The sound box *is* the guitar. What you are hearing when you play is the sound box reacting to the energy in your strings to produce the sound waves that you hear. The sound box consists of your soundboard, sides and back as well as all the bracing within it. All of these pieces are functional, all of them engineered through hundreds of years of stringed instrument building to give you an instrument that is strong, light and has the tone we associate with the modern guitar.
Sound Board
Your soundboard is likely made of cedar, spruce or in the case of cheaper instruments, laminated wood, or a type of ply wood. In the case of solid wood soundboards, care must be taken to protect these thin plates of often *very* soft wood. Be mindful of humidity and heat and sudden changes in both as they will cause the wood to swell and move. Swelling and movement *is* normal, however it is best when done gradually. For example, if you remove your guitar from an environment of 60 percent relative humidity and place it in one with only 15 percent, your soundboard will contract significantly and rapidly which can (and in this case probably would) cause cracks and other damage to occur. You should also be very weary of impacts or pressure as these can dent or crack your soundboard. Another thing to avoid is superfluous stuff on your soundboard like stickers, googly eyes or hardware and electronics. You want your soundboard to be converting energy into sound, not having that energy being absorbed by insulating material. If you take care of it, your instrument will love you back and show it with great tone that will only get richer with age.
Sides
Your guitars sides are a huge part of what holds it together. The sides provide the soundbox with the rigidity it needs to resist string pull and also are where your neck block and tail block attach. The sides of your guitar are generally going to be made out of mahogany or rosewood though there are other woods that are used as well. It is starting to be more common to see sides made from laminated wood which is cheaper for manufacturers. Now, I am of two opinions on this. On the one hand, since the sides primarily only lend stiffness to the sound box, so it makes sense from an engineering standpoint to make them from laminate. Laminate is also much less susceptible to damage. On the other hand, laminates all pretty much sound the same and these instruments tend to have a lot less tonal character than ones constructed using solid wood. If it were up to me, I would have a beater guitar with laminate sides and a really nice solid wood guitar for recording and playing shows.
With solid sides, there are some recommendations I would like to make. Don't keep hard objects like keys in your pocket when playing as I have seen this kind of thing lead to cracked sides. Another pet peeve of mine is when someone installs an output jack for electronics through the side of a guitar rather than through the neck block. It is only a matter of time before someone steps on their chord and causes a crack or tears a chunk of of their guitar. Your sides can also crack from humidity and heat just like any other solid wood part on a guitar so bare that in mind when handling and storing your instrument.
Back
Your guitar's back will typically be made out of the same material as the sides. Usually there will be a label attached to it that is visible though the sound hole denoting the make and model of the guitar. The back of the guitar also primarily serves to provide rigidity and is the main thing that keeps the neck from torquing in the direction of string pull. Like with sides, a lot of guitars you will find these days have a back made of some kind of laminate and I feel the same pros and cons I mentioned in that last paragraph also apply here.
I will also give mostly the same advice in terms of caring for the guitars back I give for its sides. Try to avoid heavy and hard things in shirt pockets and avoid shirts that have large hard buttons. Avoid impacts and pressure that can lead to cracks, dents or other structural damage.
Sound Hole
I wanted to briefly mention this part of the guitar, or rather, this absence of material that we are calling a part. The soundhole is not, despite its name where "all the sound comes out." It might be more accurate to think of the sound hole as like the port hole on the side of a speaker cabinet that allows air to move in and out of the cabinet and create pressure differential. While it's true that a lot of the pressure waves you perceive as sound do come out of this part of the guitar. The truth is actually way cooler. The whole guitar is actually producing sound waves. Mostly from the soundboard, but also the back, sides and even the neck! This is an acoustic instrument meaning its generating its sounds mechanically so all of those subtle tones coming from every single part of the instrument make up the total sound that you hear. Every single part of an acoustic guitar is part of how it sounds.
Bridge
The bridge of your guitar is a thing usually made of wood and sits somewhere near the middle of the soundboard. I am only going to talk about steel string pin bridges here since that is what will be relevant to the vast majority of players reading this. Your bridge is just the piece of wood when it comes this part. There are other parts *in* your bridge such as the saddle, and bridge pins which I will talk about in a moment, but I want to make it clear that the distinctions between these parts is very important when it comes to talking about how the instrument works or when describing an issue you are having to a repair tech.
The bridge, as its name implies, actually connects things at a distance. On a modern steel string or classical guitar, the bridge actually spans the distance between the X braces, allowing string energy to be transmitted into those braces so that that energy can be distributed efficiently to the soundboard and create pressure waves that you hear as sound. Kind of a mouthful right? I like to describe the bridge as the most important brace in the guitar for this reason. The bridge also serves as an anchor point for your stings and resists string pull causing your soundboard to pull up to the point of damaging itself.
It's a good idea to take a little bit of lemon oil to your bridge every once in a while to help condition the wood. Most bridges aren't finished so you should treat it like you would any other exposed wood part and condition it once in a while. I like to do this every string change but you can probably space that out to once every 2-3. Your should also be very mindful of the fact that while your soundboard is made of very soft, porous and absorbent wood, your bridge is usually going to be made out of something very hard, dense and oily. This means that in conditions of extreme changes in heat and humidity, your soundboard will expand and contract considerably more than your bridge. This can often result in the bridges glue joint giving out and is the #1 structural repair I get into my shop other than soundboard cracks. To help prevent this, you may consider buying a humidifier. I also would like to mention that while I see a lot of bridges that are scuffed up, scratched and dinged from people pulling out bridge pins that this sort of unsightly damage is totally avoidable if you pull your bridge pins properly.
Saddle
Your guitar's saddle is a very big deal in terms of what it does and how it influences your guitar's sound. The saddle is that little strip of material that sits in the bridge and makes contact with your strings. It marks the end of your scale length opposite the nut. Saddles are often made from plastic, micarta, corian, or bone.
This is another part of the guitar that I consider to be non-user serviceable. Carving a properly shaped saddle is something that takes a lot of knowledge and skill and is very easy to get wrong. It is also a part of your guitar that, if changed, will affect many other parts and should really only be done as part of a complete setup. I will however talk to you about different saddle materials and how they affect your tone and the benefits of compensation.
Plastic
Plastic is what saddles in most mid to low end guitars are going to have. It is cheap for the manufacturer and consistent but it also is the worst thing you can do for your tone. Plastic is a very poor conductor and it absorbs a lot of the energy from your strings before it can get to the bridge. A lot of higher frequencies and overtones simply will not be transmitted by a plastic saddle. Plastic is also soft and will wear down from stings over time. This can affect your setup, tuning, and tone. Over time, that plastic will become brittle and start degrading.
I recommend that new acoustic guitars have this plastic "placeholder" as I like to call it, pulled out and replaced with one of the materials I am about to talk about. Replacing this thing will be the best thing you have ever done for you acoustic guitar.
Bone
Bone is what saddles had been largely made from for hundreds of years. It is hard, light, durable and ages well which are all good properties to have in a saddle material. If you are looking for "the sound" people think of when they think about acoustic guitars, this is likely what you are going to want. Bone produces a very nuanced and bright tone with lots of detail and clarity. It is also beautiful! The grain of natural bone is a real compliment to any fine instrument. Bone will serve as a great saddle for the vast majority of guitar players.
This is a material that is one of the first plastics. It is vastly superior however to the ABS and PVC used in most of the cheap plastic saddles produced today. Micarta has a warmer tone than bone. It's something I have ended up recommending to players with really naturally trebly guitars as a way to balance the tone. Though it lacks some of the clarity that bone has, its a fine material to go with if it's closer to the sound you are looking for.
Corian is a reconstituted stone product. It is used to make countertops and has a number of industrial applications because its strength, heat resistance and stability. I know a lot of luthiers that love this stuff because its easy to get for very good prices, as generally the scrap from one counter top can make quite a few saddles. Its also pretty easy to work and sounds great! If you're looking for a super sparkly tone with lots of clarity and highs, I recomend this material. In particular, I think this stuff makes a really awesome 12 string saddle.
Important Tips
*Never travel with your instruments strings under tension. This can lead to structural damage.
*Never store your guitar near a source of heat or cold such as a heater or window.
*Never leave your guitar in a hot car. In some cases, cars can get hot enough to start separating glue joints.
*Never clean your guitar with paper towels or cleaning products/solvents not made for guitars. Paper towels are abrasive and will cause micro scratches in you finish. Cleaning chemicals and solvents may destroy your guitar's finish.
*Never use canned air to clean your guitar. The propellants may damage your finish.
*Use strap locks to help prevent your guitar from falling from a strap coming loose.
*Don't store your guitar on a stand. This makes it vulnerable to environmental and mechanical damage.
*If you must store you guitar on a stand, make sure it is in a corner where the walls will break the fall.
*Buy a hardshell case. I know they are expensive, but they are probably cheaper than your repair bill will be if something puts the protective properties of your gig-bag to the test.
*Replace that plastic saddle and nut if you want the best tone. You may also consider swapping your plastic bridge pins for wood or bone.
*Be sure to clean your instrument with a clean cotton rag and a good polish. I like to use Dunlop 65 here personally, but guitar stores are rife with potions and lotions for cleaning guitars. You will find something you like.
*Change your strings every 1-2 months.
*Use strings appropriate for your guitar.